


In today’s increasingly competitive business world, we don’t have the luxury to roll out new products and projects in six weeks, let alone six months or a year, as was the case in the past.

What topic gets raised by just about every management consultant, psychologist, counsellor and often your line manager? It's communication, defined as 'a two-way process of reaching mutual understanding, in which participants not only exchange (encode-decode) information, news, ideas and feelings but also create and share meaning.

It takes particular skills and an understanding of the software testing world to be a great tester. One needs technical know-how, the ability to identify the top trends and of course software testing savvy. These are skills that can be learned and practised over time. However, there is one other requirement which is often lacking - passion.

Gain insights into digital transformation decision-making with DVT. Learn how IT trends impact business strategies and stakeholder decisions.


In today's competitive business landscape we often hear that innovation, new technology and digital transformation is the answer to success. However, a critical element for any business to succeed ultimately lies with its people and how they communicate with each other.
So what are the right ingredients to building relationships and creating quality conversations? What makes an Agile team successfully work through daily standups, sprints and retrospectives? At the same token, how do we improve the collaboration between the various teams in a Waterfall environment? The one key element is trust. If we trust an individual, we are more open to ideas and new ways of thinking.
A new field developed by Judith E. Glaser called Conversational Intelligence (C-IQ) shows what it is about conversations that trigger trust or distrust. Thanks to advances in neuroscience we can understand that every conversation has a specific physiological impact. Some discussions can make us feel good or bad because neurochemicals released in our brains affect how we feel.
C-IQ is not about how smart we are, but how open we are to learning new and effective powerful conversational rituals that prime the brain for trust, partnership, and mutual success. If we look at working in an Agile way, effective communication is essential for teams to deliver consistently. One of the Agile Manifesto's core values is individuals and interactions over processes and tools. "Give them the environment and support they need, and trust them to get the job done."
C-IQ lies at the heart of building trust. A safe environment without fear is required to achieve this. By tapping into C-IQ, conversations trigger different brain activities for constructive communication. (That's the feel good and trust or distrust moment)
Some of the benefits of utilising Conversational Intelligence include:
- To activate better conversations and connect with others in a healthy and productive way. Breakdowns often occur when people talk past each other, not to each other.
- Down-regulating behaviours that activate the ‘fear’ hormone and up-regulating behaviours that activate the ‘bonding’ hormone.
- Being able to listen to connect and to not wonder what your next words will be in a conversation.
- Learning how to deal with unhealthy conversations and moving from judgement to appreciation.
All these benefits ring true to working in the software development environment. C-IQ supports a shift from “I” to “WE”, the basis of working effectively in teams. Business people and developers must work together daily throughout the software development process. The Agile Manifesto and values emphasises the role of conversations.
It is clear from the above that conversational intelligence is also a key competence for Business Analysts to have since conversations and building trust are at the core of their work.
Sound research has been invested in C-IQ based on the neurochemistry of the brain through conversations. It is up to us to discover how to build on relationships with our colleagues and teams.
Carina Fourie will present on Conversational Intelligence – the neuroscience behind conversations at the upcoming BA Summit on the 2 October at 10am. To register, click here: https://basummit.co.za/
The DVT Academy offers Conversational Intelligence Workshops to organisations and teams. Click here for more information: https://www.dvt.co.za/training-courses-conversational-intelligence-skills-development

As business analysts in an agile environment, we tend to find that our requirements are guided and approved by the product owner.

Business agility enables organisations to innovate and deliver goods. Learn the framework for business agility and tips on improving it in your organisation.


In this tutorial we will learn how to authenticate using google sign-in. Google enables us to register/sign-in to our apps using different social accounts such Facebook, Twitter or in our case Google. Let’s get started!
Android studio project
Create a new Android studio project and name it “FirebaseAuthGoogle”. For the Company domain use “myricseptember.com” and ensure that the Include Kotlin support checkbox is selected.

Leave the minimum SDK as it is and click Next. Select “Empty Activity”, than click Next. Name the activity “SignInActivity” than click Finish.
Create a firebase project
The first step is to create a Firebase project within your Firebase Console. Click on Add project:

Name your project “FirebaseAuthGoogle”. Once you’ve given your project a name, read and accepted any terms and conditions, then click the ‘Create project’ button. Once done you should see the following screen indicating that the project was successfully created.

Click the continue button where you will be taken to the welcome screen. On this screen you are given the option to create either an iOS, Android or web app. We are creating an Android app so click on that option:

Another window will open requesting some information relating to your application. Fill in the package name “com.myricseptember.firebaseauthgoogle” than add your SHA 1 key. If you don’t know how to get your SHA key follow these steps:
- With Android Studio open, click on the Gradle menu on the right to open it.
- Open the folder structure as follows: FirebaseAuthGoogle -> :app ->Tasks->android -> then double click on ‘signingReport’

Note: if the packages are not showing in the gradle menu just click the refresh button:
A window will open at the bottom from which you can get your SHA1 key:

Note: Remember to select the app option in your Android Studio project once you have your SHA key, see below:

Add the SHA key and click On Register app:

Download the JSON file and place it within your android app as indicated by the arrows then click ‘Next’:

Once you get to the screen below just click next since we will be adding all the necessary gradle dependencies at a later stage. Also after the Add Firebase SDK screen Firebase will try to check if the app has made contact, just click on ‘skip this step’:

Great! Your application is now connected to firebase, but we still have some more work to do. Let’s get to it!
Enable Google Sign-In on Firebase
In your Firebase console on the left click on the ‘Authentication’ item. From the tabs select ‘Sign-In method’ to open the window below. Select the following:

Enable Google Sign-In in the top right corner. Also provide a ‘Project support email’ and click Save.
Add Gradle dependencies
Next, go to your Android Studio project. To enable social authentication we need to add some Firebase dependencies manually. It is import to use the latest Google Login SDK version which you can find here.
Here you’ll find the latest Firebase dependencies.
Open the project level Build.gradle :
Then add the following dependency:

Next open the Module:app level gradle dependency:

And add the following dependencies:
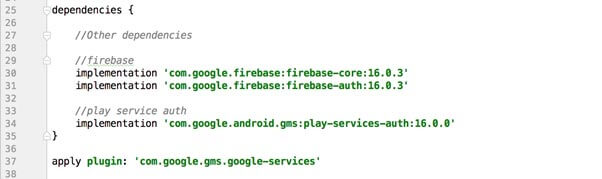
Once all these dependencies have been added, Android studio will require you to sync the project. This will download all the dependencies from the internet and will require you to have an internet connection.
Note: It is very important to ensure that you have “Google Play Services’ installed. You can do so by clicking on ‘Tools’ than selecting ‘SDK Manager’ as seen below:

After clicking on ‘SDK Manager’ the below window should open. Select the ‘Google Play Services’ checkbox and click apply. This will ensure that Sign-In works as expected on the Google Emulator as well.

Create a simple UI
Next we will create a simple UI with a single button in the middle of the screen. You can make your UI pretty but for demo purposes we are going to keep things simple.

Add the following to your “activity_sign_in.xml” xml file:

Since you need to connect to the network to authenticate with Firebase you will need to add the internet permission to your AndroidMenifest.xml:

Integrating Google SignIn
Within the SignInActivity add the following variables for the GoogleSignInClient and GoogleSignInOptions.

Next add the following method to your code. The method is used to request the user data required by your app such as the users’ ID and basic profile information, email address and Id token. Call this method in your OnCreate() method.

Add the setupUI() method to set up the OnClickListener for our login button. This method gets called in the OnCreate() method:

Next, we add a singIn() method which will be called when the user presses on the log in button. The user will be prompted to select an authentication account. The signInIntent is used to handle the sign in process and for starting the intent the startActivityForResult() is used.

Once done the onActivityResult() is called in which the selected google account is retrieved and sent to Firebase for authentication.

Note: the implementation for the firebaseAuthWithGoogle() method will be discussed below.
The authentication with Google step is now completed. Next we need to authenticate with Firebase. Declare an instance of the FirebaseAuth object.

Then in the onCreate method, get the shared instance of the FirebaseAuth object

After a user successfully signs in, gets an ID token from the GoogleSignInAccount object, exchange it for a Firebase credential, and authenticate with Firebase using the Firebase credential:

Note: The HomeActivity will be created soon
To avoid the need for the user to sign in every time the app is launched it would be better to check if the user is signed in already. This can be achieved by checking if the current user is already signed in from within the onStart() method:

Create a companion object to open the SignInActivity via intent.

Great! Everything for authentication is set up. Next we just need to create a second screen (HomeActivity) to which we will navigate once the user is successfully authenticated. You can use this screen to retrieve and display the current user’s information from the Firebase database, but that is out of the scope of this tutorial. We will simply display some text congratulating the user for successfully signing in and have a log out button at the bottom.
Home Screen
Create an Activity called HomeActivity. The activity will look like the screen below once done:

The XML for activity_home.xml should look something like the below:

Within HomeActivity add the setupUI() method which will be used to set up the click listener for the sign out button. Call the setupUI() method within your onCreate() method.

Next create the signOut() method which will be used to sign the user out of the application.

Finally create a companion object to to open the HomeActivity via intent.

We’re Done! Let’s run the application and celebrate our hard work.
Conclusion
In this article we have built a simple application that makes use of Google authentication. Firebase is great and there is much more you can do with it. I will be posting more Kotlin articles and will be using more of Firebase. I look forward to your feedback and would advise you to take a look at the repo.
Thank you for reading this article and follow me on Twitter and on Medium for future articles.
Article also published on Medium.com.

When you just want to design UX/UI, code and then sleep…
That is what you can expect at a #Girlcode Hackathon (and some food and energy drinks every now and again).
This year’s Girlcode Hackathon (#GirlCodeHack) took place at 22 on Sloane, Bryanston, Johannesburg and it was an absolute blast.
From apps that give you more insight on tertiary education, to apps that educate you on recycling in your city, to water saving games - all designed, developed and finished in 24 hours. Who said ladies can’t code and UX like a boss?
The 17 United Nations Sustainable Development Goals (Image below) of which we had to choose one or more, are the problems we had to solve.
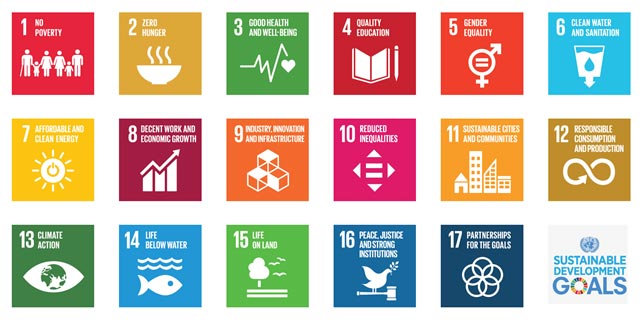
Looking at these goals, you do tend to get carried away with ideas. When my team and I sat down to discuss a goal we could solve, Paballo Moloi (Pabi) mentioned the waste issue we are currently facing in Johannesburg, which led us to ‘recycling in your city’.
Recycling does not only cover Goal 11, Sustainable cities and communities but also; 6 - clean water and sanitation, 7 - affordable and clean energy, 13 - climate action, 14 - life below water and also 15 - life on land.
Our solution, recycling, led us to create an app, Greenly, that allows you to become more educated around materials that can be recycled and which cannot. You also get all the collection and drop-off points in your city where you can recycle, but not only do you just recycle, you also get rewarded for your recycling contributions. Throughout recycling, whether it is through a collection service or whether you drop off, you will receive a QR code for each time you recycle, the QR code will give you points and as they accumulate you receive vouchers from certain retail partners in South Africa, whether it is a R100 petrol voucher, to R50 off your next grocery purchase.


I started the UX and UI of the app that was later developed by Pabi and Siphokazi Fikeni. Due to the time constraints we only chose to do an Android App and website.
Saturday morning as Pabi and Siphokazi started the Android development, I started building our website. The website gave more information regarding Greenly and also included links to the App stores for down-load. In between the day we had to give elevator presentations to say what we are up to, our progress and goals.

We then also had occasional breaks in between as well as breakfast, lunch, dinner and midnight snacks. The most challenging part was getting through the night, as we were in a venue with a semi-open roof, but myself, Siphokazi and Pabi made a plan and moved to the cafeteria and continued our coding and UX-ing till the early hours of the morning.
With a few power naps in between, we had time until 10:00 on Sunday morning to finish the whole project and get ready for the judging stages.
We had five minutes to present to one of the four judging panels, thereafter the four panels of judges got together and selected their top nine.
We are proud to say that Greenly made it to the top nine! (YEY! ?)
The top nine then had to present again, but this time to everyone and a panel of three judges. After all the teams presented, the judges made their decision for their Top 3 and the winners were announced.
So after 24 hours of coding, UX and UI design and some HTML and CSS we are proud to have ended up on the top nine. (And yes, we went home and slept and slept)
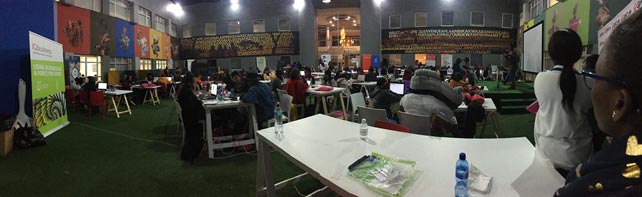
Thank you Pabi and Siphokazi, it was a weekend to remember - You are the best